
ADJUST TO TASTE
Most of us are familiar with Melitta. They’re an old school company, and one of the most popular coffee wares brands for the masses. A lot of us grew up on Melitta, or at least grew up with our parents and grandparents using their cones and filters. If you didn’t, you’ve without a doubt rolled your shopping cart past their filters in likely almost every grocery store coffee aisle you’ve ever strolled yourself down.
In 1908, Melitta Bentz, a woman from Dresden, Germany, invented the paper filter. The story goes that she gets fed up with grounds in her coffee, punches some holes in a brass pot, takes a piece of paper from her son’s school book, puts it in the pot, and brews her coffee over this contraption. Bentz ends up patenting a design, and enters the commercial registry in December of that year.
The iconic flat bottomed cone shape of Melitta we are familiar with today was solidified in 1937. In ‘54, the year my mom was born, the pastel, earthenware pots that are now rare vintage finds today were released. The Heritage Pour Over Set, my new favorite home kitchen coffee ware, is a resurrection of these mid-century earthenware designs.
Instead of giving you a strict recipe to follow, I’m going to give you some loose guidelines, so you may adjust to your own taste, and take a more easy going, cool as a cucumber approach to your mornings. I like a strong coffee, and tend to lean towards a heavier dose of grounds, so if you want something a little more delicate, just simply use a little less ground coffee.


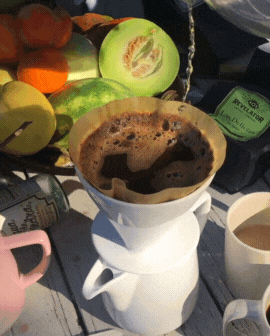
The whole thing is easy:
- Put water on to boil. Eyeball about as much as will fill the carafe. Might be good to measure at first as you get used to the volume of the carafe.
- Place the paper filter in the porcelain cone.
- Grind your coffee to medium-fine.
- Fill the filter with ground coffee, so that it fills about ½ - ¾ of the ceramic cone.
- Once water has boiled, let it sit for 1-2 minutes off boil Then, gently, and evenly wet the grounds. You don’t want a lot of coffee to drip out the bottom at this point, but no need to be too precious, a little drip is ok.
- If your coffee is really fresh (within a week or so of roasting), you’ll notice the wet grounds bloom, or expand a lot, like a muffin-top. If this is the case let this happen for about 30-40 seconds or so. If your coffee is closer to 3-4 weeks or more off the roast date, it won’t bloom as much, and that’s ok, just let the bloom happen for 15 seconds or so.
- Start to steadily pour (not too fast, not too slow) the water in a circular motion. You want the stream of water to make contact in the slurry of the brew, but not necessarily smack in the middle, and not washing down the sides of the filter surface. If and when you get about an inch from the rim, pause, and let the brew drip some before you resume.
- Pour until you’ve used the amount of water that will fill the carafe. If you’re afraid you’ve used too much, or not enough, just lift the cone for a sec to see where you’re at.
- The whole process, from the very first pour the last drips that come out the cone should take between 3.5-5 minutes.
- Too fast? Grind finer. Too slow? Grind a bit coarser. Too strong? Use less coffee next time. Too weak? Can’t be having that mess, add more ground coffee to filter next time. Filling the carafe will give you a few servings of coffee. Enough for one or two participants, depending on personal intake. You may also use this set to brew less coffee, simply use less grounds, and less water.
Enjoy in the comfort of your own home, maybe in the light of a window, or in the garden with the birds. With oranges, or whatever or however or with whomever you like to spend your earlier hours. Enjoy in the comfort of your own home, maybe in the light of a window, or in the garden with the birds. With oranges, or whatever or however or with whomever you like to spend your earlier hours.